
Comment ajouter un système de matchmaking à un jeu multijoueur compétitif au tour par tour

Le service de matchmaking d'Edgegap est un système de matchmaking entièrement géré et infiniment personnalisable qui regroupe de manière optimale les joueurs du monde entier - et son utilisation est gratuite pendant le développement de votre jeu multijoueur au tour par tour.
C'est également le seul système de matchmaking (à notre connaissance) avec des règles de matchmaking basées sur la latence pour offrir l'expérience multijoueur en ligne idéale pour votre jeu, quel que soit le moteur (Unity, Unreal, etc.) ou les services de jeu (EOS, UGS, PlayFab, Heroic Labs Nakama, Braincloud, etc.).
Comme notre service de matchmaking est basé sur des paramètres, il n'est pas nécessaire d'écrire du code. L'intégration est donc très facile et si nécessaire, nos guides d'intégration vous accompagnent à chaque étape.
Lorsque votre jeu est en ligne, étant donné que notre système de matchmaking est entièrement géré, vous n'avez pas besoin de gérer l'infrastructure, les bugs, les pannes, l'évolutivité ou la gestion des bases de données. Nous nous occupons de tout pour vous, réduisant ainsi votre charge de travail DevOps à presque zéro.
Comment intégrer le matchmaking à votre jeu multijoueur au tour par tour
-> Cet article est basé sur la documentation de Matchmaking. Si vous rencontrez des problèmes ou des incohérences, assurez-vous de vous référer au guide original, car ils sont plus fréquemment mis à jour.
L'exemple suivant vous aidera à tester le flux de joueur principal de matchmaking , à savoir :
Créer l'instance de correspondance sur le Cluster d'Hébergement partagé,
Définir des règles et des paramètres dans votre Configuration de matchmaker,
Et enfin, tester le flux de joueurs et gérer les Tickets Joueurs avec notre API.
Il y a cinq étapes pour implémenter notre matchmaker dans votre jeu :
La première étape consiste à créer un compte et à utiliser notre exemple de jeu de stratégie. Voilà, vous avez (techniquement) terminé à moitié ! Il vous suffirait d'intégrer le matchmaker dans votre jeu (voir étape 5).
Maintenant, vous ne devriez jamais suivre aveuglément un exemple JSON trouvé sur Internet, il est donc fortement recommandé d’adapter les règles ci-dessus à votre jeu au tour par tour. L'étape 2 (« Explorer la Configuration ») est notre « comment lire » qui explique la fonction de chaque règle de matchmaking (« Explorer la Configuration »).
L'étape 3 (« Examiner les Détails de l'Instance ») couvre votre matchmaker personnel afin de s'assurer qu'il est déployé et fonctionne avec le design de votre jeu.
L'étape 4, comme son nom l'indique (« 4. Tester l'API de Tickets »), consiste à tester si vos demandes de matchmaking des joueurs sont reçues par le matchmaker, appelées tickets.
L'étape 5 (« Intégrer Matchmaking dans votre Jeu ») souligne comment intégrer le matchmaker dans le projet de votre moteur.
Si vous rencontrez des problèmes de dépannage, notre Centre d'Apprentissage propose des conseils de dépannage supplémentaires.
1. Configuration du Forfait Gratuit
Enregistrez-vous pour votre compte Edgegap gratuit, et accédez à la page de tableau de bord Matchmaker.
De là, cliquez d'abord sur Créer Matchmaker, puis saisissez :
Un nom pour votre matchmaker – qui est purement pour votre propre référence, par exemple
quickstart-dev,Ensuite, téléchargez l'exemple simple ci-dessous en tant que configuration JSON pour votre jeu au tour par tour :
(petit rappel pour s'assurer de changer le nom de l'application et la version pour correspondre à votre Application et Versions !)
Si aucune erreur de validation n'apparaît, appuyez sur Créer et Démarrer et attendez que le processus se termine. Cela aboutira au démarrage d'un nouveau cluster gratuit, avec votre matchmaker Exemple Simple.
Vous pouvez maintenant passer à l'étape suivante.
2. Explorer la Configuration
Règles de jeu compétitif au tour par tour uniques
Spécifiquement pour les jeux au tour par tour, vous pouvez définir plusieurs Profils de Matchmaking pour des règles et paramètres de modes de jeu spécifiques :
restreindre le rang à une différence entre deux joueurs pour des jeux plus décontractés,
restreindre la différence de rang pour ne permettre que les adversaires du même rang pour les jeux classés,
permettre aux joueurs de fournir leurs préférences de carte et de choisir une carte adaptée à tous,
ajouter une interface de sélection de hub pour restreindre les adversaires aux Balises de Ping spécifiées,
restreindre la latence du matchmaking à un seuil maximum pour éviter de jumeler des joueurs éloignés,
restreindre la latence du matchmaking à une différence maximale pour maximiser l'équité du ping,
allouer plus de CPU ou de mémoire en utilisant différentes Versions d'Application lorsque plus de joueurs sont autorisés,
Rejoindre en groupe pour des lobbies prédéfinis ou pour remplir des équipes sans dépasser les tailles d'équipe.
Commencez avec les conditions idéales, et élargissez les restrictions pour assurer des correspondances rapides :
détendre lentement les restrictions de latence au fil du temps pour trouver plus de joueurs,
augmenter lentement la différence de rang autorisée pour trouver plus de joueurs,
augmenter le temps entre les expansions pour les rangs les plus élevés (challengers), car moins de joueurs sont disponibles.
Créez des tickets avec un rang plus élevé pour des matchs de promotion, pour affronter des adversaires plus coriaces.
Définissez des profils de tricheurs distincts pour garantir que les tricheurs signalés ou les joueurs ayant de nombreux rapports de modération n’impactent pas négativement l'expérience des joueurs légitimes dans les matchs classés.
Gestion de Versions Sémantiques
Chaque nouvelle version utilise la Gestion de Versions Sémantiques pour communiquer clairement l'impact des changements en interprétant le format majeur.mineur.correctif :
les versions
majeuresincluent des changements majeurs qui nécessitent une révision d'intégration,les versions
mineuresincluent des améliorations substantielles compatibles rétroactivement,les versions
correctivesincluent des corrections de bogues et de petites améliorations.
Certaines déploiements peuvent entraîner des Erreurs. Nous essayons de résoudre cela en réessayant le déploiement jusqu'à max_deployment_retry_count fois automatiquement (sans confirmation client).
Pour s'assurer que les plantages inattendus du client ou les tickets abandonnés ne persistent pas et n'occupent pas vos ressources de matchmaker, les tickets seront annulés après ticket_expiration_period entraînant leur statut à changer en ANNULÉ puis supprimés définitivement après ticket_removal_period.
Le cœur de notre logique de matchmaking est configuré dans les Profils de Matchmaking. Chaque profil est une file d'attente de matchmaking complètement isolée, pointant vers des Versions d'application avec une quantité prédéfinie de ressources CPU et mémoire (RAM) requises.
Les Règles de Matchmaking dans le jeu de règles initial doit être respecté pour regrouper les joueurs, chacune définie par trois propriétés :
nom de votre choix, par exemple -
taille du match,type de règle, également connu sous le nom d'opérateur, par exemple -
nombre_joueurs,et enfin, attributs de l'opérateur, par exemple
nombre_équipesoutaille_équipe.
Règle de Nombre de Joueurs
C'est une règle spéciale définissant combien de joueurs doivent correspondre pour initier l'affectation :
nombre_équipesse réfère au nombre d'équipes, 1 équipe peut être utilisée pour des modes coopératifs ou free-for-all,taille_équipese réfère au nombre de joueurs par équipe.
Notre exemple simple démontre un jeu coopératif avec 2 joueurs.
Veuillez noter que la "Règle de Nombre de Joueurs" est requise et peut être définie une seule fois dans vos règles de configuration initiales.
Règle des Latences
Utilisez cette règle pour offrir le ping le plus bas possible à tous les joueurs. Une fois que les clients mesurent et soumettent leur temps aller-retour (ping) contre toutes les balises disponibles, Gen2 n'envisagera que des matchs avec une certaine différence dans les valeurs de ping, mesurée contre les Balises de Ping. Cela présente une solution "soft" pour diviser votre base de joueurs, permettant de correspondre avec les régions voisines, améliorant surtout la vitesse de correspondance des régions moins peuplées. Utilisez latence_max pour éviter de correspondre avec les joueurs situés à une grande distance.
Vous pouvez maintenant passer à l'étape suivante.
Notre exemple de règle beacons ci-dessus avec "différence": 50, "latence_max": 200 initial :
200) et le reste est dans | A-B | >Alice et Bob correspondraient, puisque Pékin est exclu (> 200) et le reste est dans | A-B | < 50 :
Alice {Montréal: 12.3, Newark: 45.6, Dallas: 59.9, Pékin: 264.4} ; et
Bob {Montréal: 27.3, Newark: 32.4, Dallas: 23.1, Pékin: 252.2}.
200) et le reste est dans | A-B | >
Charlie et Dave ne correspondraient pas, car | C-D | > 50 pour la Balise de Dallas :
Alice {Montréal : 5.7 Newark : 44.2, Dallas : 59.5, Pékin : 263.2} ; et
Bob {Montréal: 57.8, Newark: 32.0, Dallas: 24.2, Pékin: 272.3}.
Veuillez noter que « Règles de Latences » peut être défini une seule fois dans vos règles de configuration initiales.
3. Examiner les Détails de l'Instance
Examinez les détails de votre nouveau matchmaker dans notre tableau de bord une fois qu'il est initialisé :
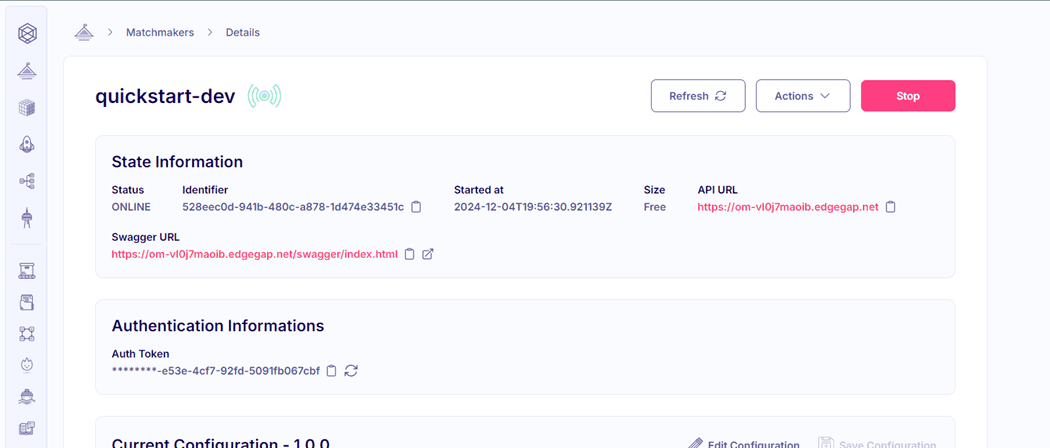
Statut indique la santé du service, peut être EN LIGNE, HORS LIGNE ou ERREUR.
Identifiant aide le personnel d'Edgegap à trouver rapidement votre matchmaker si vous avez besoin d'aide pour le dépannage.
Démarré à peut être utile pour suivre l'heure de la dernière mise à jour.
Taille correspond à l'un de nos Forfaits Tarifs.
URL API sera utilisée par les clients et serveurs de jeu pour communiquer avec Gen2.
URL Swagger est une interface GUI de spécification openAPI pratique que nous fournissons pour explorer le schéma de l'API.
Jeton d’authentification est un jeton secret unique utilisé par les clients et serveurs de jeu pour l'authentification.
Pour tester votre nouveau matchmaker en utilisant l'API, vous aurez besoin de l'URL Swagger, URL API et du Jeton d’authentification.
Vous pouvez maintenant passer à l'étape suivante.
4. Tester l'API de Tickets
D'abord, ouvrez votre URL Swagger pour inspecter votre schéma openAPI dans l'interface Swagger
Cliquez sur l'URL /...swagger.json sous le titre « Matchmaker » pour ouvrir le schéma JSON brut :
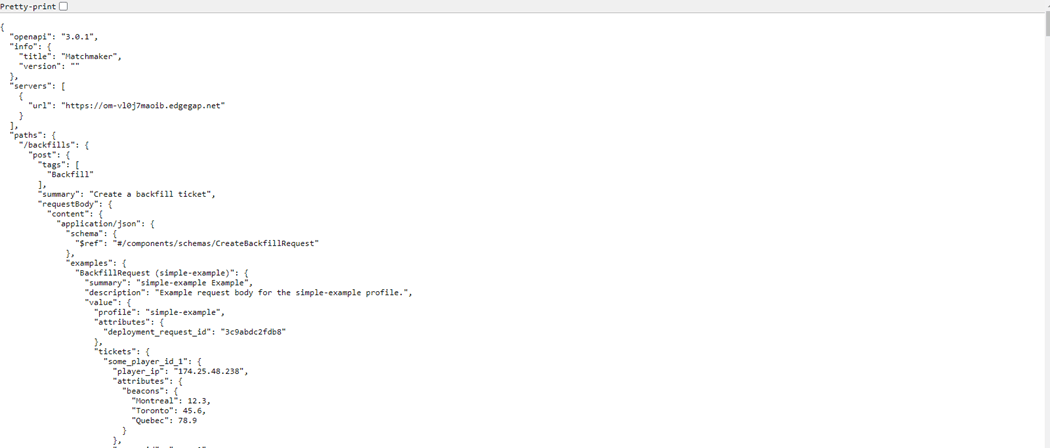
Enregistrez cette page en tant que fichier sur votre lecteur (CTRL/CMD+S).
Ouvrez votre application Postman et connectez-vous à votre compte gratuit.
Importez votre fichier swagger.json de l'étape précédente :
gardez Collection Postman sélectionnée,
séléctionnez Afficher les Paramètres d'Importation et changez le paramètre Génération de Paramètre en Exemple.
Confirmez l'importation, cela se traduira par une nouvelle collection apparaissant dans la liste des Collections à gauche, intitulée Matchmaker.
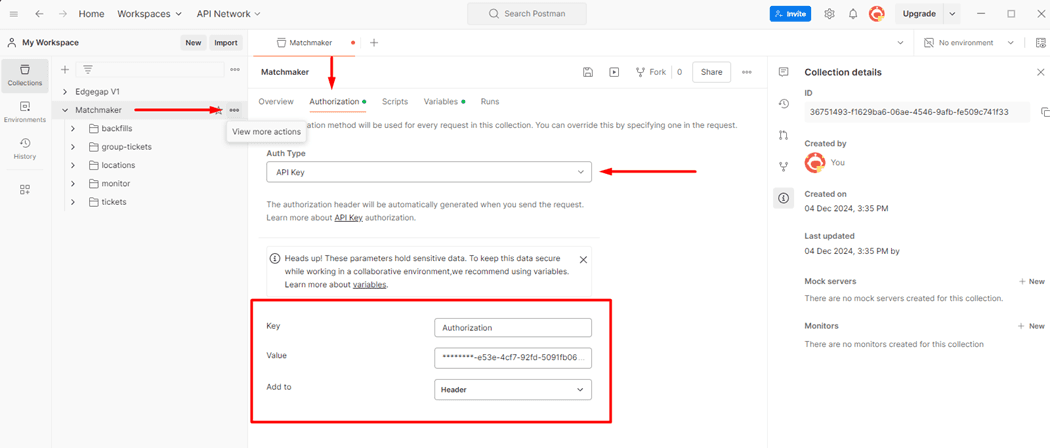
Voir plus d'actions, ouvrez l'onglet Autorisation et choisissez :
Type d'autorisation - Clé API,
Clé - « Autorisation »
Valeur - insérez votre valeur de Jeton d’authentification ici,
Ajouter à - En-tête.
Appuyez sur (CTRL/CMD+S) ou sur l'icône Enregistrer pour enregistrer les modifications. Le point orange dans votre onglet Postman devrait disparaître.
Dans votre collection Matchmaker, sélectionnez tickets et Créer un ticket de matchmaking, ouvrant un nouvel onglet.
Sélectionnez l'onglet Corps pour prévisualiser votre demande de ticket de joueur :
notez adresse_ip_joueur définie sur null - cela entraînera l'utilisation de l'adresse IP automatiquement ajoutée à votre demande (voir Intégration Serveur à Serveur pour des alternatives),
profilse réfère à vos Profils de Matchmaking,attributsincluent des valeurs pour vos règles de matchmaker, dans ce cas pour la règlelatences,la règle
nombre_joueursest la seule règle qui ne nécessite pas d’attributs dans les tickets des joueurs.
NOTE : Assurez-vous de vous référer à l'importation de la configuration Swagger de l'exemple.
Cliquez sur Envoyer et examinez la réponse à votre demande de ticket de joueur :
idest votre ID de ticket de matchmaking unique, gardez-le enregistré pour vérifier votre ticket plus tard,profilconfirmant le choix des Profils de Matchmaking,id_groupeest un ID de groupe unique attribué à chaque ticket, un joueur solo est représenté comme un groupe de 1,voir Rejoindre en Groupe pour le matchmaking avec vos amis ou lobbies,
adresse_ip_joueurest l'adresse IP publique résolue du joueur, quel que soit le mode d'authentification utilisé,affectationest définie sur null pour indiquer que le ticket n'a pas encore été mis en correspondance ou affecté à un serveur,créé_àfournit des informations sur le moment où le ticket joueur a été créé pour l'utilisation de l'interface utilisateur du jeu,statutindique l'état actuel du ticket, tous les tickets commencent enRECHERCHE(voir Processus de Matchmaking pour plus de détails).
Créez un second ticket en cliquant à nouveau sur Envoyer, ainsi nos deux joueurs se correspondent et un serveur est démarré.
Dans votre collection Matchmaker, sélectionnez {ticketId} et Lire un ticket de matchmaking.
Saisissez l’ID du ticket de la réponse à l'étape précédente et cliquez sur Envoyer.
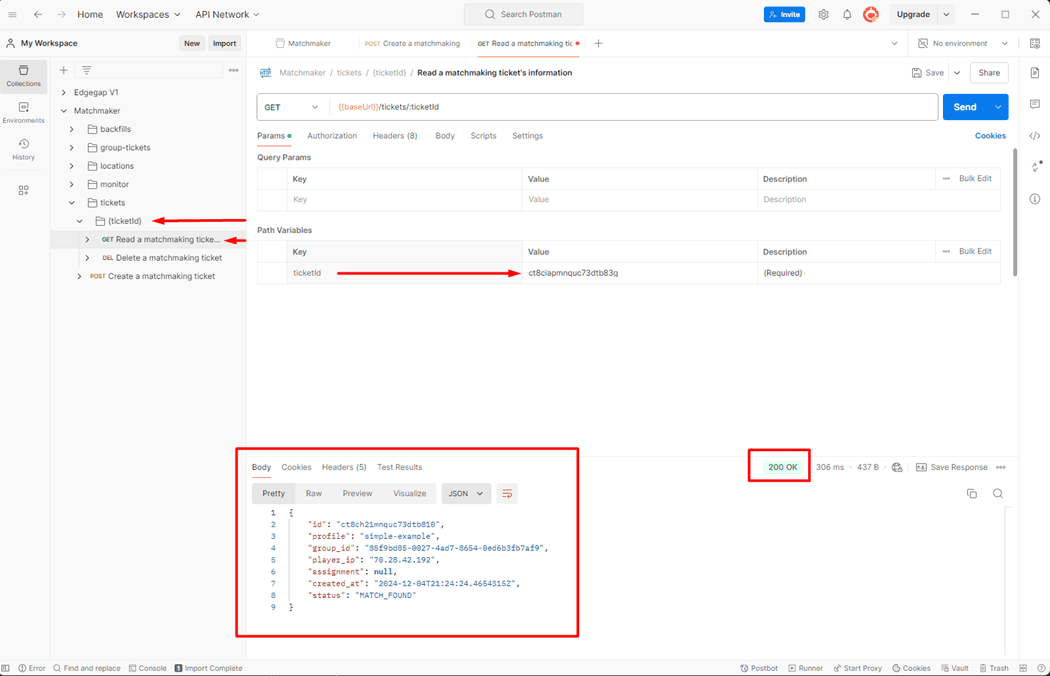
Examinez l’affectation mise à jour pour votre ticket de joueur :
le statut a changé en
MATCH_TROUVÉd'abord, tout en gardantaffectationdéfinie surnullpour indiquer que les joueurs ont été mis en correspondance et qu’un serveur est en cours d’attribution,
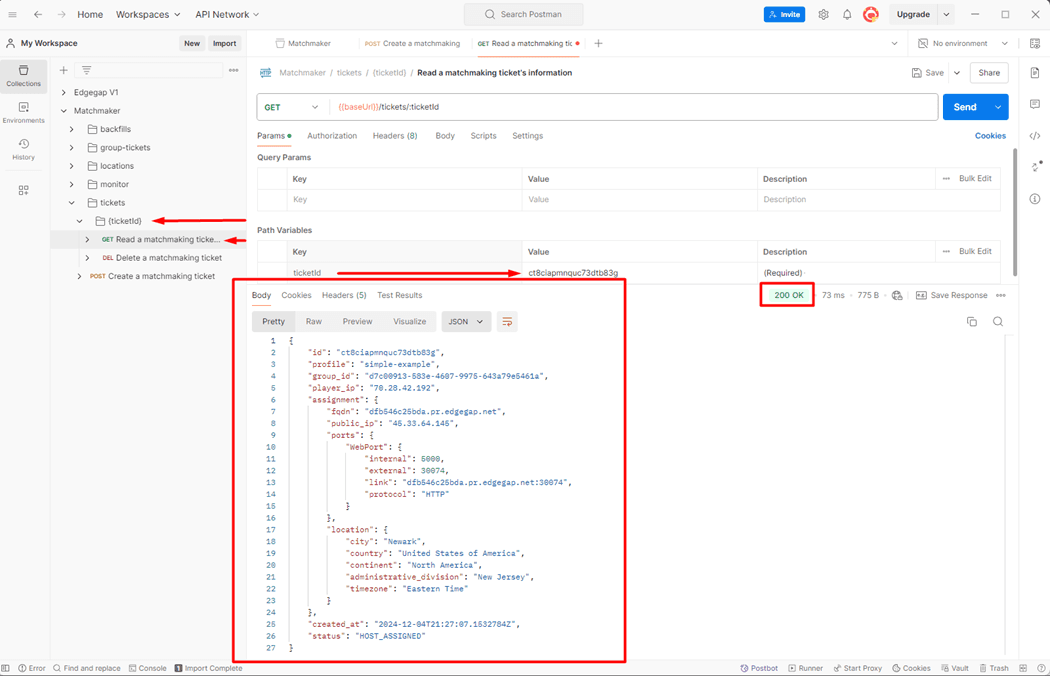
Cliquez sur Envoyer à nouveau pour vérifier votre ticket, et examinez l’affectation mise à jour pour votre ticket de joueur :
le statut a changé en
HÔTE_ATTRIBUÉavecaffectationcontenant les détails du serveur attribué.
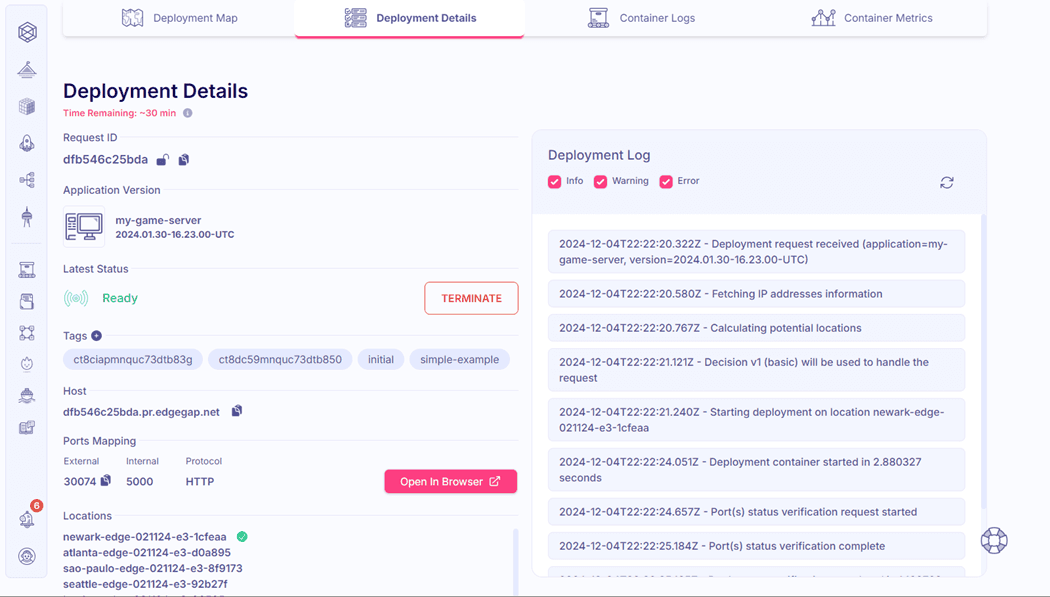
Inspectez votre nouveau déploiement dans notre tableau de bord :
notez que chaque déploiement est étiqueté avec tous les IDs de ticket et le profil pour une traçabilité supplémentaire.
Essayez de vous connecter depuis votre client de jeu au serveur attribué.
Une fois que vous vérifiez que vous pouvez vous connecter à votre Déploiement sans problèmes et que vous avez terminé les tests, Arrêtez votre Déploiement pour libérer de la capacité dans votre compte pour la prochaine construction.
Vous pouvez maintenant passer à l'étape suivante.
5. Intégrer le Matchmaker dans votre Jeu
Le matchmaking d'Edgegap s'intègre :
avec Client de Jeu, pour gérer les Tickets Joueurs,
avec Serveur de Jeu, pour :
traiter les préférences des joueurs transmises par leurs tickets,
en option, pour prendre en charge le Backfill pour ajouter ou remplacer des joueurs après le démarrage.
Pour le Client de Jeu, nous recommandons de fournir des mises à jour du statut des tickets tout au long du Processus de Matchmaking aux joueurs via l'interface utilisateur du jeu pour une meilleure expérience. Voir :
Edgegap - Unity Gen2 Matchmaking SDK,
importer l'exemple simple et le personnaliser selon vos besoins,
Betide Studio - Kit d'Intégration Edgegap pour Unreal Engine,
télécharger le projet exemple et le personnaliser selon vos besoins.
Dans le Client de Jeu, assurez-vous de gérer les erreurs non répétables :
HTTP 404 Introuvable- le ticket a été supprimé,HTTP 500 Erreur Interne du Serveur- panne temporaire du service.
Dans le Serveur de Jeu, traitez les préférences des joueurs et le contexte initial du serveur. Aucune intégration API n’est requise :
Lire les Variables d'Environnement Injectées (Gen2) pour récupérer les données de matchmaking initiales des joueurs.
Lire les Variables d'Environnement Injectées (Versions d'Applications) pour les paramètres spécifiques à la version, les paramètres (capacité des joueurs) et les secrets.
Lire les Variables d'Environnement Injectées (Déploiement) pour les informations de déploiement, telles que l'adresse IP, la localisation, ou plus.
Une fois les joueurs connectés, le Serveur de Jeu et les Clients de Jeu démarrent une scène de chargement pour réaliser les étapes de synchronisation (par exemple, sélectionner et charger une carte/scène/niveau). Nous recommandons une scène 3D complète, une interface sociale de type lobby, ou un écran de chargement avec une barre de progression, pour indiquer que l'initialisation est en cours.
Une fois que les Clients de Jeu sont entièrement chargés, les joueurs chargent/transfèrent à la scène principale de jeu.
En option, le Serveur de Jeu peut créer et gérer le Backfill et la capacité des joueurs (ajouter ou remplacer les joueurs qui partent).
Assurez-vous que votre déploiement sera correctement arrêté en utilisant le URL SUPPRIMER Injecté, si :
aucun joueur ne rejoint le match,
tous les joueurs ont quitté le match,
le match se conclut correctement.
Félicitations, vous avez terminé l'intégration du Matchmaker Edgegap ! Si vous souhaitez en savoir plus, lisez tout à ce sujet dans notre Centre d'Apprentissage.
Écrit par
l'équipe Edgegap


